Showing posts with label china glaze. Show all posts

Tuesday, October 1, 2013

30 Day Challenge: Inspired by a Tutorial


We did it! Well, maybe. I'm perplexed. Some people think this is the last day of the challenge and others are going with 31 days. I don't know.

I'm getting this out a day late since I ran out of time after finishing this design yesterday. I was going to do an apple tutorial but then pulled out my China Glaze Peachy Keen and decided I wanted to used it, so I did my own take on this tutorial by Jennifer Marcus.


Kind of cool, right? It's sort of like a tribal print, which I'm generally not too great at, but I like a few of these. It's hard to tell, but the light color is a pink from Sinful Colors.


Because I was going out in public and didn't want to look weird with only one hand painted, I went for a full on manicure. With the exception of my pinky (which was basically a lost cause), I actually think I like how my right hand turned out better than my left.


The lines are far from perfect, but compared to some of the earlier challenges, I think I've come a long way. This challenge has been difficult and tiring, but awesome practice and really fun as well. So, perhaps in a few days I'll throw in the 31st challenge, but until then, I want to thank those of you who have liked my posts and commented. The feedback means so much to me and has been very encouraging. I'm excited to see what everyone comes up with post-challenge!

Happy Painting!


Friday, September 27, 2013

30 Day Challenge: Inspired By Art

I LOVED this challenge! It was so fun to paint paint again, and I found beautiful inspiration in this painting by Pol Ledent:


About 2 hours and a ton of polishes later, here was the result of my inspiration:


I used some sponging and a paint brush technique to replicate the style, and tried to break up different parts of the painting onto each nail.


I'm quite happy with the result. I think it was a pretty great interpretation, but I'm a bit biased. I did a lot of mixing of my polishes in order to get the right smoky colors, which is part of the reason this took so long. Also, I just really had fun painting like this, so I took my time to try to get everything as close to the original as I could. I really wish you could see these in person, as they look so awesome!


Thankfully I already did tomorrow's challenge earlier today, so I can keep these guys on over the weekend.

Alright, ready to see the ridiculous amount of polishes I used for this one?

Polishes used:
NYC In a Minute Sidewalkers
Essie Blue Rhapsody
China Glaze Bahemian Escape
Sally Hansen Xtreme Wear Blue Me Away
China Glaze First Mate
NYC French White Tip
China Glaze Kalahari Kiss
China Glaze Lemon Fizz
China Glaze Sun Worshipper
NYC Times Square Tangerine
China Glaze Peachy Keen
Sinful Colors Easy Going
Sally Hansen Xtreme Wear Cherry Red
China Glaze Street Chic
Bon Bons Black
My Golden Yellow Nail Art Pen
Seche Vite (top coat)

Happy Painting!


Monday, September 16, 2013

30 Day Challenge: Tribal

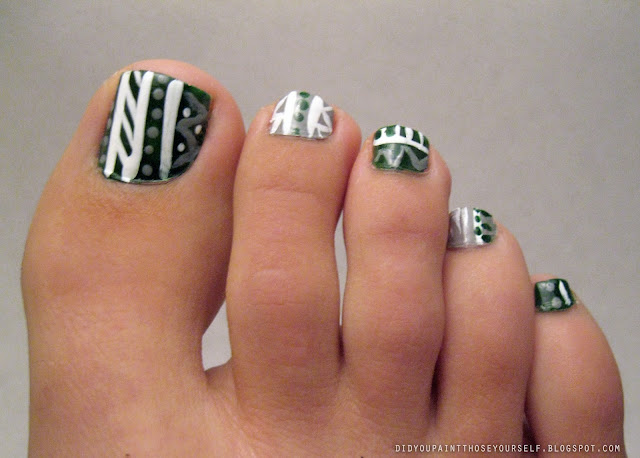
My roommate Ashley has been wanting me to paint her nails for a while, so last night I asked her if she wanted a tribal print. She said she though that would look cool on her feet, so I let her pick out the colors she liked, and this is what I came up with:


This was my second time ever trying out the tribal print. It's a lot harder than you'd think to try to get so many details on little toes. Actually, Ashley has really nice toes to work with.


I'll have to practice the tribal print more when the challenge is finished since I really like the designs I've seen for them so far. 

I'm starting to run out of both my regular polish remover and my pure acetone, so I'm trying to use as little of it as possible since I really can't afford more at the moment, which means I may fall behind a bit on the rest of the challenge. But, I did promise Ashley I'd give her a pumpkin manicure sometime soon, so I'm thinking that may end up being what I do for the half moons challenge.

Tomorrow is supposed to be glitter, and that makes me very sad. I don't want to waste a pedicure on glitter. Can someone please convince me that glitter designs can be something other than gaudy and girly?

Polishes used:
NYC Quick Dry Sidewalkers
Finger Paints White Striper
China Glaze Holly-Day


Happy Painting!

Sunday, September 15, 2013

30 Day Challenge: Delicate (Fall Dots)

I found my camera! So hopefully the pictures will be better from now on (I can see a small difference, at least). I originally had a different idea for today's challenge, but then I saw a cute little dot graphic and thought it would be fun to try to recreate with fall colors.


I was definitely a bit sloppy around my cuticles, but to be fair, I was really into the Packers game while trying to do this. Sometimes the commercial breaks aren't long enough.


I actually have smaller nails considering the length of my fingers, so it's difficult to appreciate just how tiny (or delicate) these dots are in these pictures. Trust me, this was some of my steadiest work.


See, aren't these pictures better? Ah, the wonders of macro. And I finally  remembered to add a watermark to my pictures. Now I feel like a legit blogger. Another friend told me after seeing these that I should start doing nail art as a side business, so I'm really starting to consider that option. We shall see!

Both of my roommates want me to paint their nails, so hopefully I can convince them to try the challenges coming up. Especially glitter, because I can't stand glitter.


Polishes used:

Sinful Colors Snow Me White
Sally Hansen Xtreme Wear Cherry Red
Pure Ice Magic
Pure Ice Hot Tamale
China Glaze Street Chic
Seche Vite Top Coat

Happy Painting!

Saturday, September 14, 2013

30 Day Challenge: Flowers

My good friend and recent roommate Kelly is visiting for the weekend. I noticed that she has lovely large nail beds and she was happy to let me paint her nails.


I had been browsing google for pictures of flowers to use as inspiration, I showed Kelly a few options and we both really liked this colorful dot design. It literally looks just like this. I think it turned out quite well!


I have to say, I think this might be my favorite or second favorite design of the challenge so far. It was pretty easy, since all I needed was a dotter, but it was time consuming. I think it took around an hour since there were a lot of colors and a lot of waiting around for colors to dry. 


Kelly seems to really like the end result as well. I like this so much that I think I may have to use it for myself after the challenge is over. Or maybe for the recreate a design day- that's the last day I think, right? I think the only thing I'd need to change is to apply a second coat of the base brown. 

Kelly is also trying to convince me to start a little business painting nails and doing makeup and other beauty related things. I'm pretty sure I can't do any of those things fast enough to be really successful, and I'm a bit sloppy yet, but it's something to consider. Getting paid to do something you love is the best, right?

Colors used:
China Glaze Street Chic
Sinful Colors Snow Me White
China Glaze Bahamain Escape
China Glaze Lemon Fizz
Sally Hansen Xtreme Wear Lacey Lilac
Sally Hansen Insta Dri Lickety-Split Lime
OPI Kiss Me On My Tulips
Seche Vite Top Coat

I'd love to hear your thoughts on this manicure. 

Happy Painting!


Thursday, August 15, 2013

30 Day Challenge: Gradient (with step by step instructions)


Well, this is the second time I've ever done a sponge gradient. My first time was a bit splotchy, and while everyone says it's an easy process, I still messed up more than I wanted to. So for today's mani I decided to do a step by step with some tips and tricks. Granted, it's still not the best gradient you've ever seen, I'm sure, but it's much better this time. And I really like the colors! So let's get started:

Step 1: Pick your colors/gather your materials


For my basecoat, I used NYC In a NY Minute. This is pretty great if you only want to keep your mani for a day or two, as your polish will literally pop right off after 24-48 hours. But, as the name implies, it only take a minute to dry.
Originally I planned on just using the Sally Hansen Lickety-Split Lime and China Glaze Shower Together, but decided to add the navy last minute. It was a good choice, as it added more depth to the gradient. And finally, I topped it off with everyone's favorite top coat- Seche Vite. 

Step 2: Apply as base color


Other tutorials recommend using the lightest color for your base, which is wise. It's hard enough to build up the dark colors on top of light, so I imagine unless you're using white on a dark color, stick with the light color as a base.

Now you have to be patient and let the color dry completely so it doesn't smudge when you start sponging. Like, REALLY let it dry. In the meantime you can get tape ready to protect your fingers since sponging gets pretty messy. I only taped my left hand, and yes, while it's annoying to tape every finger, it really does speed up the clean up process.

Step 3: Cut your sponge into a shape slightly smaller than your nail and prep your colors.


Do NOT use a sponge like the one pictured above! It will not work well, trust me. That is, unless you're really into getting strands of fibers stuck in your polish. Get a good blob of paint down on foil (I prefer foil over plastic) and put your colors close so that they overlap. You can use two at a time or three. I found two to be easier for building up the colors. Make sure you add the color you chose for your base, otherwise it will not blend very well. Then let the sponge soak up all the paint, and quickly dab it over your nail. I'd go up and down and to the sides to get a good blend. You'll have to do this a few times if you want the paint to be true to color. It goes relatively fast, however. 

Step 4: Continue sponging with additional colors


This is what it looked like with two colors. I had wanted more of a transition to a blue hue, but the bright lime made my shower together look more green, so I decided to add navy. 


(Also, use a sponge like the one shown in the picture above) So after a little trial and error, I found that pairing up the second and third color is easier than trying to use all three at once.  And although it's not pictured here, I'd recommend using your top coat as soon as you've finished each finger, since it will help it blend the colors even more (my right hand is more blended, but I didn't take pictures of that hand...so imagine this one, but better).

Step 5: Topcoat and clean up


Once you take off the tape you'll see how much time you saved on cleaning up the mess! Or maybe I'm just a messy painter...no, I definitely am, but considering the nature of sponging, it's pretty hard to not get it all over your fingers. 

Step 6: Marvel at the final result


Besides my pinky, which got messed up from using the wrong sponge, I think this looks pretty cool. It definitely looks awesome at a distance. Actually, you can see the gradient much better from a distance, and it looks pretty smooth. Not too shabby for my second attempt. And I love the colors, it's great for summer.

Do you have any tips on using the sponging technique? If so, share them in the comment section.

Happy painting!

P.S. Do you agree that the pictures look much better with the lightbox I built last week? I think it has really enhanced the quality.


Tuesday, October 16, 2012

30 Day Challenge 3: Yellow

For this weeks challenge, I painted both my toes and my fingers! It's rare for me to paint my fingers, but as I had a wedding to go to, I decided to match my nails to my dress. I finally found a yellow that I love (China Glaze Yellow Fizz) that isn't too bright, but is also a nice creme that goes on opaque in two coats. I'm pretty happy with both my fingers and toes this week.