Monday, December 24, 2012

Urbana Nails

It's finally here! I leave tomorrow to start my work at Urbana (I've been working for Urbana since August). To commemorate this joyous occasion, I of course gave myself an Urbanicure!

I'm surprised with how good the colors turned out. I only needed to blend the yellowish green color with a bright Sally Hansen yellow and my InstaDri Lickety Split Lime. All my other colors were dead on with the logo:
Not too shabby, eh?
It was much trickier to paint my right hand, but the logo still turned out pretty well, if only a bit lopsided. I did do a slightly different design on my right hand fingers, only having "12" vertically and excluded an accent nail, but the coloring is the same. On my left hand I added a 2100 logo for an accent nail since I worked on some Urbana media during my internship with 2100 and also to "promote" the 2100 recruitment session at Urbana.

I've been looking forward to Urbana for a while, but nothing gets me quite in the spirit for Urbana like an Urbanicure! See you in Saint Louis!


Sunday, December 16, 2012

30 Day Challenge: Black and White and snowflake fingers

Back on track with the challenge this week with black and white nails.

I'm pretty happy with how they turned out. It's a little hard to see but I used my China Glaze Catwalk for the grey in the gradient, which looks really great in person. I didn't think I would like this day of the challenge very much, but it ended up being one of my favorites. 

I was really sick last week so I didn't do my nails. I felt like I was sort of in withdrawal! So because of that and also because I received two lovely new polishes from my secret santa at work, I decided to paint my fingernails.

I have to say, I totally love these colors from Essie (I did the opposite colors on my left hand) and think they make a great base for snowflakes. I've never done snowflake nails, and the tutorials make it look a lot easier than it actually is. It wouldn't be so difficult, perhaps, if you used a needle for the small lines. With some practice and different tools, I think I could make these pretty clean looking. Nonetheless, I'm happy with how they turned out. And it was good to practice painting my fingernails again since next week I'll be painting them with the Urbana 12 logo for the conference (more info at urbana.org). 


Sunday, December 9, 2012

Nail Art Challenge Day 7: Rainbow


This weeks challenge was actually supposed to be black and white, but I got the two mixed up and did rainbow first (it makes more sense after going through the rainbow in previous weeks, right?). Anyhow, this was my first time using the sponging technique, and I think I need some more practice, but overall I like how it turned out.


Sunday, December 2, 2012

30 Day Challenge 6: Purple

Last weekend I did a quick pedi with a few different patterns with a lovely lavender base. It turned out pretty well, but I'm realizing that I have yet to get my dotting and striping technique clean.
On another note, I started using Burt's Bees Lemon Butter Cuticle Cream and after a couple days I'm already seeing a difference. I'm excited to see if I can heal up my rough feet in another week or so to the point where clean up is easier around my cuticles.

Saturday, November 24, 2012

Give Thanks for Paint

Over the holiday I offered to paint a few family members' nails. My cousins searched my pinterest nail art board and picked two designs they liked. I hadn't tried either of the designs, but thought it would be a nice challenge and they both seemed pretty realistic to do in an hour (I have slow hands).

First up, my lovely cousin-in-law Lyssa's design:

The color accuracy and photo quality aren't the greatest, but this is pretty close to how they looked. This was my first time using tape to get straight lines. I only taped the middle triangle section and hand painted everything else. I think it turned out pretty well and I can definitely see the advantage of taping but I think I'll try to find thin strips of tape so I can have better lines. I used 3 China Glaze paints- Lemon Fizz, Peachy Keen (it's less orange in person), and Shower Together. The color combination is pretty pleasing. This was my first time painting someone else's fingers in a LONG time. It was rather enjoyable.

This morning before we left I quick did my cousin Hannah's toes with this gradient stripe design. It's different from the inspiration photo (which is angled, all one color family, and has much straighter lines), but considering I did it in a rush and entirely freehand, I think it turned out really well.
Again, I apologize for the photo quality/color

Hannah seemed to like the end result, and this design is really perfect for her, given her love for the ocean. I did realize while doing this that I could really use some new tools. If you have advice for brushes or other tools that hold paint well and can do striping and very intricate details, please leave a comment. 

It was really a pleasure to do these designs this weekend! I'll have to find more people back home that would like a free manicure/pedicure, since it's really great practice for me and I find it really relaxing and fun.

30 Day Challenge 5: Blue

I've been really busy lately, so for this/last week's challenge, I just did a really quick blue dot design. Since I was so busy, I didn't have a change to take pictures for a week, and decided to take them while out of town for the holidays, so the picture isn't the greatest, but you can basically see what I did.

I used 3 shades of blue (two of my new China Glaze colors) and a silver.

I also did my purple challenge while out of town, but I'll wait a few days to post those pictures.

Sunday, October 28, 2012

30 Day Challenge 4: Green

This week's design for the Nail Art 30 Day Challenge is inspired by green. I took a bit longer to remove my last design than normal since it's been a crazy couple of weeks, so I was up for something fun. Well, these color block nails took a LONG time, but I'm super happy with how it turned out!
It's all by hand, so the lines aren't perfect, but I didn't feel like slicing tiny strips of tape to make it even. I think I did a pretty good job for freehand.

(I have gross cuticles since I haven't found a good creme yet, so yes, this is photoshopped)

Colors used: Sinful Colors Snow Me White, Wet N Wild Shine Black Creme, China Glaze Kalahari Kiss, Sally Hansen Insta Dri Lickety-Split Lime, China Glaze Holly Day

In other news, I used Chalboard Nails' lightbox tutorial to try to enhance my pictures. I do think the detail is coming out better, but as you can see from these pictures I still can't get the color to be consistent. I think it may be the kind of light bulb I'm using. I guess I'll try to figure it out for next week's design.

Happy painting!


Tuesday, October 16, 2012

30 Day Challenge 3: Yellow

For this weeks challenge, I painted both my toes and my fingers! It's rare for me to paint my fingers, but as I had a wedding to go to, I decided to match my nails to my dress. I finally found a yellow that I love (China Glaze Yellow Fizz) that isn't too bright, but is also a nice creme that goes on opaque in two coats. I'm pretty happy with both my fingers and toes this week.


30 Day Challenge 2: Orange

For my orange nails, my original idea was to do some cool fall leaves design...but it sort of backfired. I guess it wasn't terrible, but it looked a bit more like fall vomit than fall leaves.


Sunday, September 16, 2012

30 Day Challenge Day 1: Red (Cherry Print)


Time to start the 30 day challenge (scroll down to see the upcoming challenges)! Because I just don't have the time to do a new design every day, plus I feel like it's sad to take off a design so quickly, I will be doing a new design every week.
I saw this tutorial on pinterest a while back and knew I had to try it. I love cherry print. Always have. I have blankets, pillows, shirts, swim suits, and more in cherry print. I don't know why, it just makes me happy. Anyway, I think it turned out relatively well. It didn't take too long, either. 

Picture time!


Check back next week for the Day 2 challenge


Saturday, September 8, 2012

Cool Dots

I was planning on starting the 31 day nail challenge this week, but I decided to push it back a few days. I just got my new dotting tools and seche vite this past week and wanted to try them out. Chalkboard Nails is having a nail art contest where you create a design using only cool or warm colors. I just bought this pretty new polish- Sally Hansen's Xtreme Wear Mint Sorbet. I decided it would be a lovely base color for a cool tone flower design made up entirely of dots. I'm still getting used to the different dotting sizes, but I think these turned out pretty good for my first attempt. Commence many pictures!


Sunday, August 26, 2012

Splatter Toes (with mini tutorial)

Today was filled with firsts. First splatter nails, first time using new polishes, first time taping, and first (mini) tutorial. Let's get right to it.
WARNING: The pictures are all very grainy. I had bad lighting and because the flash distorted the design, I had to resort to less than awesome photo quality. Sorry!

I bought a few new Sally Hansen polishes this week and I'm not sure how I feel about them. I have wanted to start investing in better polishes, but have yet to find any that are reasonable and still effective. I had good luck with the Insta-Dry kind, but not as impressed with the Xtreme Wear. I have some Seche Vite and a China Glaze on the way, as well as some actual dotting tools. I'm looking forward to seeing how those all work out. What brands do you find work best for nail art? Anything on the less than $5 side?

I wanted to go with a yellow constant, as I was hoping my new yellow would work out. It's not as opaque as I was hoping, but it wasn't neon either, so I guess color wise it was a draw. I got out all the colors I planned on using, came up with an idea of the colors I thought would go well together, and started with a base coat. Then I taped.
As I mentioned earlier, this was my first time taping. I'm so glad I did, as the splatter method really is rather messy. I now realize that you should tape first before applying any polish, since I smudged a couple nails as I applied the tape. It worked really well and didn't take any of the color on my nails off when I removed the tape. I'll definitely be using this more often. It saved me a ton of time and acetone.

Next, I got my small coffee straw (which in the tutorials I've seen were recommend), put down my tinfoil, and dipped the straw in.

It took a surprisingly long time to get the method down right. I had to twist my leg around, hold my foot at what was hopefully the right angle, and stay that way long enough to get the paint on the straw and blow. It didn't work very well at first. I thought I could use a bigger straw, so I got creative and used an old pen (just take the ink out and use the shell). It worked MUCH better (although it was still tricky). I think another contributor to the difficulty was that my paint was a bit thin and fast drying. If you've done this before and have some tips on what tools/polishes work best, please leave a comment.

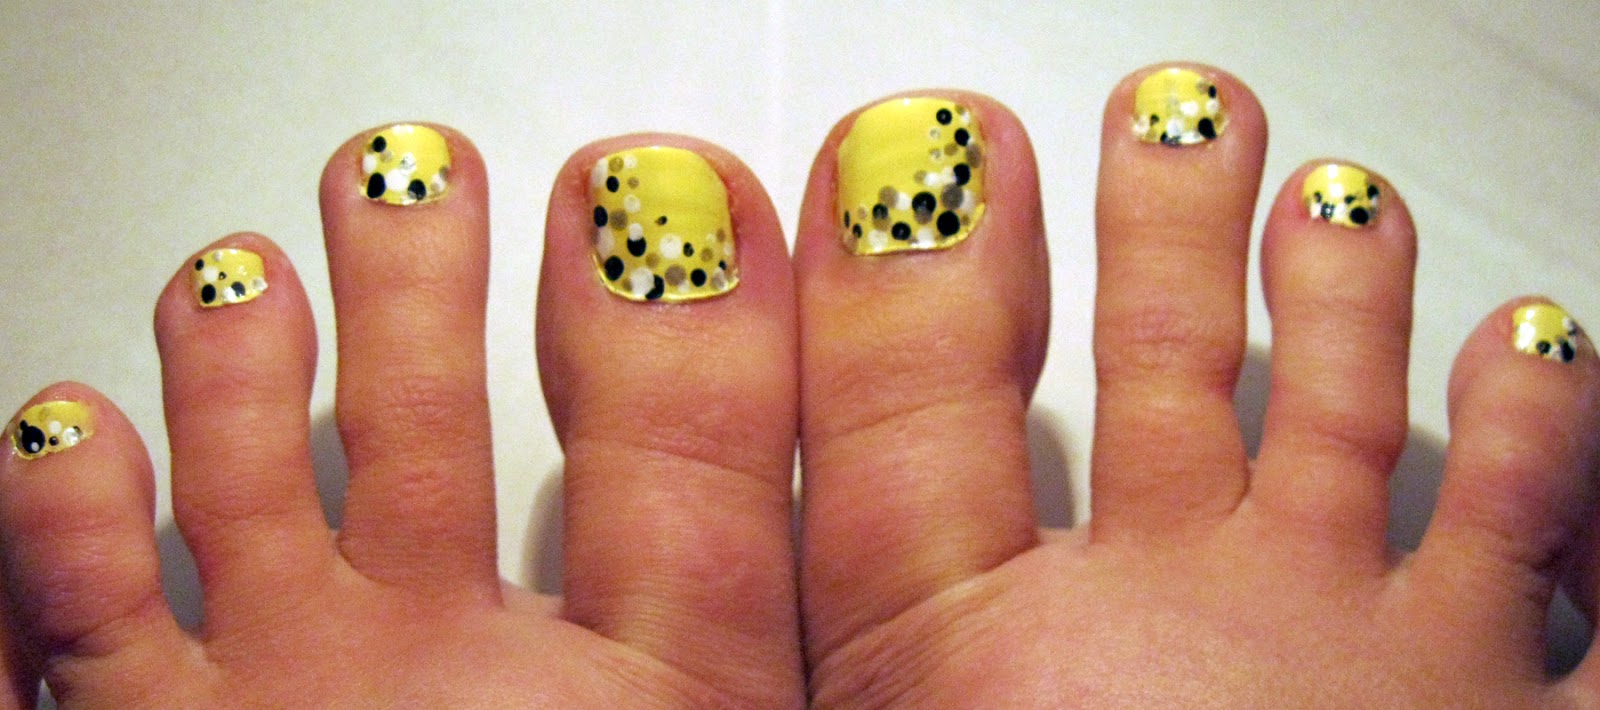
I started to get the hang of the technique, and eventually figured I was close enough to getting it right to call it quits. Before clean up, it sort of looked like a nail salon threw up on my feet (which actually looked pretty cool).

And although it was hard to blow on my toes, it was not hard to hit my fingers!

I let everything dry for a while and cleaned up in the meantime. Eventually I became impatient, took the tape off, cleaned up the edges, and put on some top coat.


Each foot had a few toes that turned out pretty well, and each had some that were a little sad. But overall, I'm pretty happy with how they turned out- especially the big toes.

So that's it! If you haven't tried this method, give it a shot. It's pretty cool. 
I'll definitely try this again, although I may need some assistance next time.


Next week I'll start the 31 day challenge. Because I'm busy and don't like to change my polish that frequently, I'm going to change it to 31 weeks, most likely with a few interruptions in there. Have you done the challenge? Link to your pictures.

Happy painting!

A short introduction

For about the past 3 or 4 years I've taken on the fun, tedious hobby of nail art. The thing is, I never paint my fingernails. I have a terrible habit of picking the dirt out of my nails, so I find it rather pointless to wear polish.
But I adore painting my toenails in fun designs. This came out of my insecurity of having large feet with long toes. I figured if I had cool designs people would focus on that rather than notice my somewhat unattractive feet. So far it seems to be working.
Nail art is a great hobby, and it's always nice to have respected artist friends give your feet props (or really anyone, for that matter).
I rarely would take pictures of my designs, but as I have become even more obsessed with the hobby lately, I figured now is as good a time as any to start documenting my work. I mean, they only last a week or two.
The reason I decided to start this blog is that while there are many sites dedicated to nail art, there is a surprising lack of sites dedicated to toe nail designs. Feet are important too, people. Most of the toe designs I've come across aren't up to par with fingernail designs, so my goal is to bridge the gap. Yes, toes are more challenging (having to contort for an hour or more isn't very pleasant and you have a smaller work space), but they're also really fun.
I'll possibly do some tutorials as well. I'm going to be trying more designs out of my comfort zone, and I'm hoping through this process I'll become a better artist.
Thanks for checking out my little blog!